Publish and go live
Preview your store privately, run a final check, and publish it to the world with confidence.
Going live is the moment your store opens to customers. Before that, you can preview everything privately, then publish when you're happy with how it looks.
Preview your store
Take a look at your store the way a customer will see it. Browse your homepage, click into a few products, and add something to the cart to make sure it all feels right. Previewing lets you spot anything you'd like to fix before launch.
Preview on more than one device if you can. Most of your visitors will shop on a phone, so it's worth checking that your text reads clearly, your images look good, and the buttons are easy to tap on a small screen.
Publish your changes
When you make edits in your dashboard, you choose when they appear on your live store. Publishing pushes your latest changes out so visitors see the up-to-date version. Until you publish, your work-in-progress stays private to you.
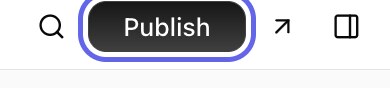
The Publish button sits in the top-right of your dashboard. The arrow icon next to it opens a live preview of your store in a new tab, so you can check everything before you publish.
Note: Publishing isn't permanent. You can keep editing after you go live and publish again whenever you want — each publish simply updates what customers see.
Your store address
Every store comes with a free web address ending in .yns.store that works right away — see Your free store address. When you're ready for a more personal address, you can connect a custom domain you already own.
Final pre-launch check
Before you announce your store, run through a few quick checks:
- Place a test order — go through checkout yourself to confirm the whole flow works.
- Confirm payments are connected — make sure Stripe is set up so you can actually get paid. See Connect Stripe to get paid.
- Check shipping and taxes — confirm the right delivery options and tax appear at checkout.
- Review your key pages — look over your homepage, products, and legal pages.
A quick pre-launch checklist to confirm you're ready:
| Check | Why it matters |
|---|---|
| Test order completes | Confirms customers can actually buy |
| Stripe connected | You can't receive money until it is |
| Shipping shows at checkout | Customers know what delivery costs |
| Tax calculates correctly | The right total is charged |
| Legal pages in place | Protects you and reassures customers |
| Store reads well on mobile | Most shoppers are on a phone |
Tip: Not sure you've covered everything? Run back through your setup checklist one more time before you publish.
After you go live
Launching isn't the finish line — it's the start. Once you're live, keep an eye on a few things:
- Watch your first orders in your dashboard and ship them promptly. See Manage orders.
- Keep improving. You can edit your store and publish again any time, so refine as you learn what customers respond to.
- Spread the word. Share your store address, set up your social links, and consider starting a newsletter.
Once you're confident, publish your store and share your address. You're live!
FAQ
What happens when I publish?
Publishing pushes your latest changes out so visitors see the up-to-date version of your store. Anything you haven't published stays private to you until you do.
Can I keep editing after I go live?
Yes. Going live isn't a one-time event. You can edit your store as much as you like and publish again whenever you want — each publish updates what customers see.
How do I test checkout before launching?
Place a test order yourself: add a product to the cart and go through checkout to confirm the whole flow works, including payments, shipping, and taxes. This is the best way to catch issues before customers do.
Do I need a custom domain to go live?
No. Every store comes with a free .yns.store address that works immediately — see Your free store address. You can add a custom domain later whenever you're ready.
What's next
- Double-check everything with your setup checklist.
- Manage your first sales in Manage orders.
- Make your address your own with a custom domain.